17. Advanced Topics
18. Transferring Data to and from an Instance
An Atmosphere instance only contains data that were included in the original image that was used to make that instance. You can transfer data to/from the CyVerse Data Store, an Atmosphere Volume, a sever, or your local machine.
18.1. Transferring Data using iCommands
iCommands is installed on every Atmosphere instance by default
- Open terminal, start the iCommands configuration using the command
iinitcommand and enter configure.
Note: This configuration is a one-time step on your first use with this instance.
$ iinit
# As prompted, enter the following values:
$ **Host: data.cyverse.org**
$ **Port: 1247**
$ **User: your_cyverse_username**
$ **Zone: iplant**
$ **Password: your_cyverse_password**
If you make a mistake in your configuration you can edit~/.irods/irods_environment.jsonon your instance.
- Verify that your iCommands installation works and is properly configured using the ‘ils’ command to list the contents of your Data Store home directory
$ ils
- To download a file from the Data Store to your instance, use “iget”
$ iget -option data_store_file
‘-r’ - recursive transfer of directories and their contents
‘-P’ - display the progress of the upload
‘-f’ - force the upload and overwrite
- To upload file from your instance to the Data Store use “iput”
$ iput -option file_on_instance location_on_data_store
- Additional Frequently used iCommands
$ ipwd print current directory
$ imkdir create directory
$ icd # change directory
iCommands has a variety of options, to see progress of transfers, operate recursively, and more. See additional iCommands documentation on the CyVerse wiki.
19. Creating custom Atmosphere Images
cd /opt

sudo su

ezd

ezs

apt-get install debootstrap

curl -O -L https://repo.continuum.io/miniconda/Miniconda3-latest-Linux-x86_64.sh
bash Miniconda3-latest-Linux-x86_64.sh #install in /opt/miniconda3

echo export PATH=$PATH:/opt/miniconda3/bin >> ~/.bashrc
source ~/.bashrc

conda config --add channels defaults
conda config --add channels conda-forge
conda config --add channels bioconda

conda install -y fastqc multiqc trimmomatic trinity time salmon

apt-get install tree sl

apt-get update && sudo apt-get -y install gdebi-core r-base

wget https://download2.rstudio.org/rstudio-server-1.1.463-amd64.deb
gdebi -n rstudio-server-1.1.463-amd64.deb

RSTUDIO_LATEST=$(wget --no-check-certificate -qO- https://s3.amazonaws.com/rstudio-server/current.ver)

`echo http://$(hostname):8787/`
20. ssh-rsa-key for password-less login
- Cryptographic keys are a convenient and secure way to authenticate without having to use passwords. They consist of a pair of files called the public and private keys: the public part can be shared with whoever you’d like to authenticate with (in our case, CyVerse Atmosphere!), and the private part is kept “secret” on your machine. Things that are encrypted with the public key can be be decrypted with the private key, but it is computationally intractable (ie, it would take on the order of thousands of years) to determine a private key from a public key. You can read more about it here
- Create the RSA Key Pair on your laptop/computer:
$ ssh-keygen -t rsa
- Store the Keys and Passphrase. Once you have entered the Gen Key command, you will get a few more questions:
$ Enter file in which to save the key (/home/demo/.ssh/id_rsa):
- You can press enter here, saving the file to the user home (in this case, my example user is called demo).
$ Enter passphrase (empty for no passphrase):
- It’s up to you whether you want to use a passphrase though we recommend NOT to!.
- The public key is now located in /home/demo/.ssh/id_rsa.pub. The private key (identification) is now located in /home/demo/.ssh/id_rsa
- Copy the Public Key
- Once the key pair is generated, it’s time to place the public key on the server that we want to use.
$ cat ~/.ssh/id_rsa.pub
- Copy all of the text that constitutes your public key and we will place it in our Atmosphere accounts.
- You are now ready to deposit your generated public key onto your Atmosphere account, to gain secure login each time you build and use an instance on Atmosphere.
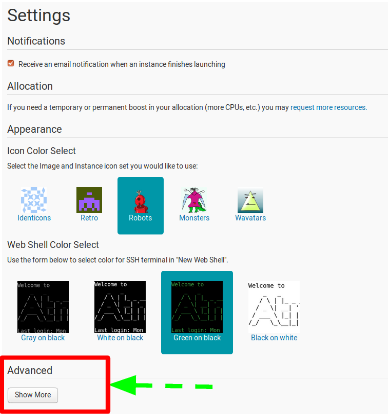
- Click on your username on the Atmosphere page and navigate to ‘Settings’ page

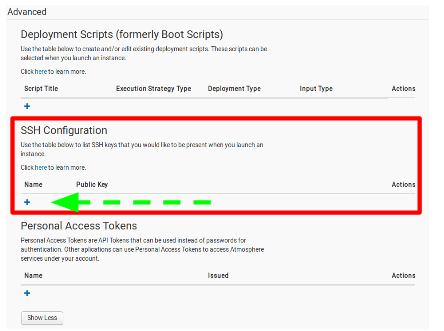
- Scroll down to the advanced section and click on ‘Show More’
- In the ‘SSH Configuration’ section, click on the ‘+’ sign
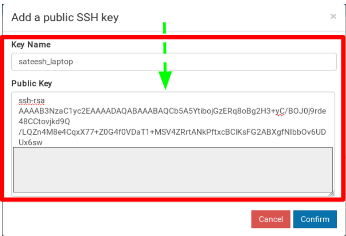
- Paste your public key generated earlier and give this key a name
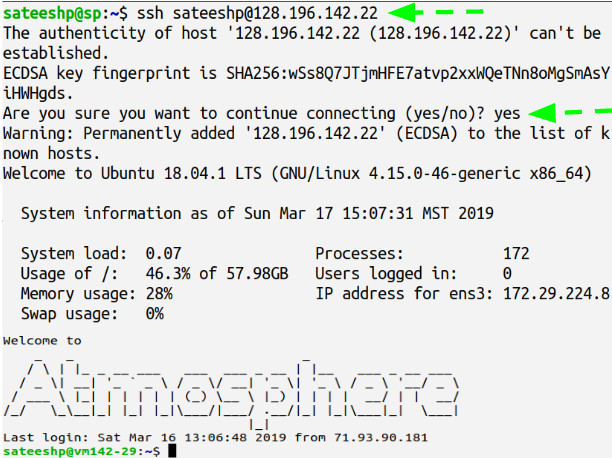
- You can now securely login to all the instances you launch on Atmosphere without having to type your password each-time you ssh login.
21. Tmux & Screen
Have you ever faced the situation where you perform a long-running task on a remote machine and suddenly your connection drops, the SSH session is terminated and your work is lost. Well it has happened to all of us at some point, hasn’t it? Luckily, there are utilities like Tmux & Screen that allow us to the resume our sessions.
22. SSH Remote host ID Changed Error
- When we suspend an instance and re-start it, the IP address might change. But, when two instances get the same address this login-error might pop-up
@@@@@@@@@@@@@@@@@@@@@@@@@@@@@@@@@@@@@@@@@@@@@@@@@@@@@@@@@@@
@    WARNING: REMOTE HOST IDENTIFICATION HAS CHANGED!     @
@@@@@@@@@@@@@@@@@@@@@@@@@@@@@@@@@@@@@@@@@@@@@@@@@@@@@@@@@@@
IT IS POSSIBLE THAT SOMEONE IS DOING SOMETHING NASTY!
Someone could be eavesdropping on you right now (man-in-the-middle attack)!
It is also possible that a host key has just been changed.
The fingerprint for the ECDSA key sent by the remote host is
SHA256:6vr1EYq1C1DJnWEoE9k2gfbaXUhsEM2iF9jKuhfNs2o.
Please contact your system administrator.
Add correct host key in /home/sateeshp/.ssh/known_hosts to get rid of this message.
Offending ECDSA key in /home/sateeshp/.ssh/known_hosts:9
  remove with:
  ssh-keygen -f "/home/sateeshp/.ssh/known_hosts" -R "128.196.142.26"
ECDSA host key for 128.196.142.26 has changed and you have requested strict checking.
Host key verification failed.
- Executing the ssh-keygen -f command as above will delete the conflicting key the known_hosts file.